Easy Exercises to Quickly Unlock Your Hip Flexors!
Hey, I’m Coach Brian Klepacki of HealingThroughMovement.com and leading certified fitness trainer.
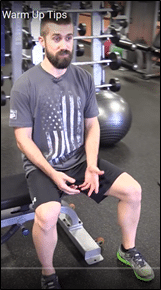
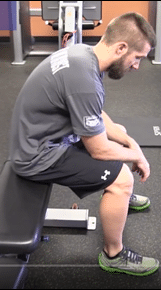
If you’re like most people, you sit for hours each day. The photo on the left is actually the proper position when you’re sitting. But take a look at the photo on the right, which is how most people look when they’re at their desk or driving in their car. Note how rounded the back and shoulders are. This is the typical position for most people who sits for long hours.
What happens when you move from this unhealthy seated position to standing?
Everything in the front part of your body remains tight and crunched up, especially the hip flexors. So, in order to eliminate pain and irritability in the entire front part of the body we need to loosen it up.
I’m here to show you some simple, yet powerful, exercises that will help loosen your tight hip flexors so you can begin enjoying better overall flexibility and health.
The best part? These easy movements will work regardless of your age, state of your health, or even if your only previous exercise has been walking to the refrigerator to make a sandwich!
Now, before we get started, let me stress that properly warming-up before your workouts is vital to avoid injuries and to get the most out of the exercises.
For example, many people who start exercising without properly warming up increase their pain, stiffness and other problems. And their hip flexors only become tighter!
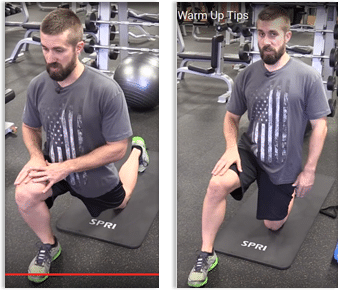
Warning: Always Warm Up Your Hips!
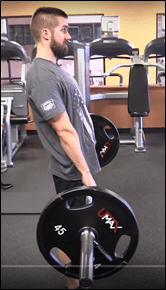
This is an example of the dire consequences when you go immediately to a deadlift without properly warming up. Check out my hips in this photo. They’re hyperextended in the wrong position, which leads to problems.
So, if you’re not properly warmed up in the hip flexors, you’ll very likely experience some hip pain while exercising, or when you’re finished with your routine.
And the photo on the left is just one example out of many of the problems with performing exercises without stretching and warming up first.
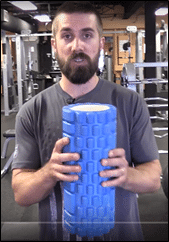
Your Must-Have Tool: The Foam Roller!
Introducing a key tool for beginning your exercise program, and ensuring it remains safe and delivers results, the incredible foam roller. The foam roller is a simple, yet highly effective, tool you can use for your entire body. However, for today, we're just going to focus on the tight hip flexors.
Where can you purchase a foam roller? Most professional gyms and sports equipment stores usually carry high quality foam rollers at affordable prices.
The Simple Hip Flexor Roll
Let’s begin with an effective stretch and foam rolling technique for your tight hip flexors.
Place the foam roller on the floor and get into position (see photo below). Please note that the hip flexors are in a very small region of your body. With your hip crease on the foam roller, simply apply pressure to the roller, roll gently back and forth. That’s really all there is to it! When your body turns a bit, try to target both the outside and inside of the hip flexors. Spend about a half a minute or so on each side.

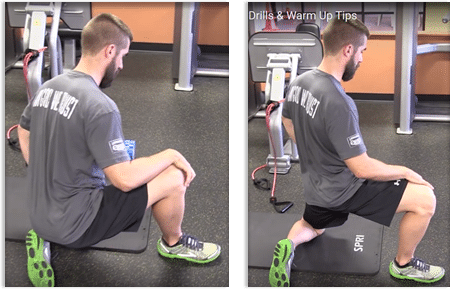
You just rolled out your left hip, so flip over, put the roller underneath your tailbone, and lean back. Now, you’re going to stretch out your left hip flexor. Since you just rolled it out, it’s loosened up. Extend both your legs out, stretch out, and pull your right knee into your chest.
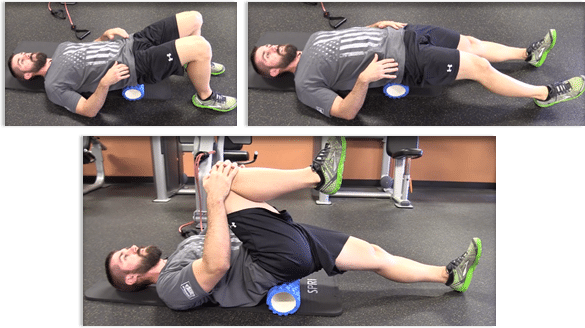
Allow me to explain why you pull the right knee into your chest….
You see, the right side is connected to the left side, and your hip flexor is controlled from that right glute. As you pull the right knee into your chest, you’ll feel a tremendous stretch in your left hip flexor.
The reason why the roller is placed underneath you is to elevate your hips and get into that hyperextended position, gradually pulling into your chest. Again, 20 to 30 second hold, and then release.
Now, perform the same movement on the other side starting with the Hip Flexor Roll again.
Get right into that hip crease for 20 to 30 seconds, flip over again so you’re on the tailbone, and extend your legs back out. You just successfully rolled out your right hip! Pull your left knee up into the chest. Again, you’ll feel a deep stretch in your right hip flexor and left glute. Ease into the stretch. Hold it for about 20 to 30 seconds.
Awesome job so far!
Keep in mind that’s just one highly effective hip flexor rolling technique you can use with the foam roller. But it’s one of the most important exercises you can use to stretch out your hip flexors.
Now, I’m going to show you even more movements that will really help open up your locked hip flexors.
We just rolled out the hip flexors and stretched them out. We also stretched a small part of the groin and glute. This next one is considered the most effective hip flexor stretch of them all, and might even look familiar to you. It’s called…..
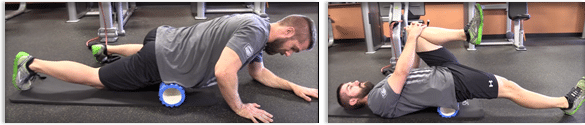
The World’s Greatest Stretch Minus the Twist
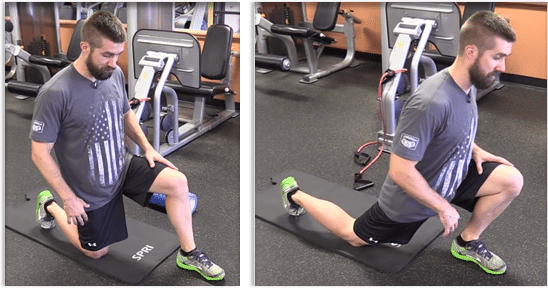
 You’re going to get into a long lunge stride, keeping the back knee up off the floor. Don’t panic, there are a couple of easy ways to do this. If you’re not comfortable bringing the back knee up off the floor, simply place the foam roller under your knee to help support it.
Once in position, drop your body down as low as you can to the floor. Hold it for about 20 to 30 seconds. Your right hip should be fully extended. Try to fully relax in that hip. And notice that your left leg is pretty far forward. This position helps to open up the opposite glute.
Eliminate the roller and keep your back knee up, and now you’re able to sink down deeper into that stretch. This will rely more on the upper body’s strength to hold you up.
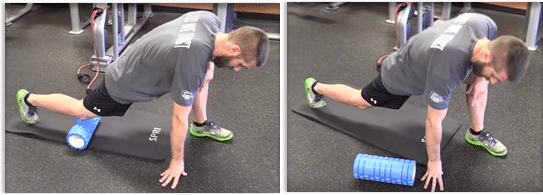
Repeat for the other side. Your right leg is forward, pointing straight ahead, while your left leg is facing the ground on the roller. Once again, try to fully relax the hip, sinking down as deep as you can go.
If you’re more advanced, get rid of the roller, while keeping your back knee up, and then sink your hip into the floor. Hold for 20 to 30 seconds.
Congrats!
You’ve just learned an awesome hip flexor stretch to get you loosened up for movement, running, or other sports.
If You’re Experiencing Back Pain…
If you’re experiencing any kind of back pain while loosening up your hip flexors, which is common among beginners, repeat the hip flexors stretches and perform the following easy pain-relieving exercises:
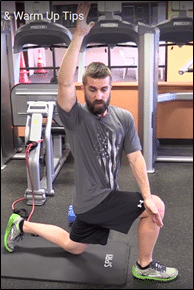
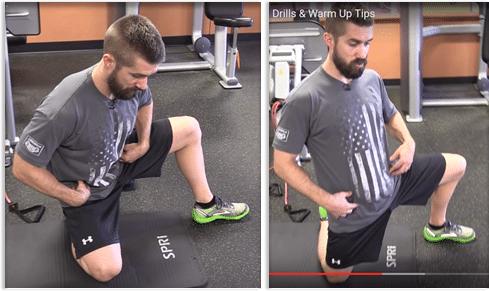
 Back Twist: Get into a half kneel position with 90 degrees in both knees. Maintain a tall spine and keep your shoulders pulled back. Begin to rock forward, keeping the left leg forward. Now, place your right hand on the outside of your left knee, and then pull, pushing against your left leg, while you pull your body to the direction of your front leg. Hold this for about 20 to 30 seconds, and release.
Rock back and forward in those hips, and twist hard to the leg that’s in front. The left leg is pointing straight ahead, while your right leg is pointing straight down. Repeat this movement on the other side.
 Great job!
If you want to intensify this stretch, get into position and then reach up as high as you can. You’ll target the thoracic spine, which is slightly above the shoulder girdle. Release, rock back, repeat, rock forward, twist and extend.
Don’t forget to breathe while performing these movements!
Even if you don’t suffer from back pain, this is a great thoracic spine movement and hip flexor exercise to help loosen up the body and prepare you for safe and effective movements.
For all the squatters and dead lifters out there, here’s an awesome mobility drill for the hip flexors to prepare you for squats.
To begin, your front leg is at 90 degree and you are sitting on the heel of your back leg. Your left leg is forward, while the right leg is underneath you with your foot underneath the body. Tuck your tailbone underneath you, you are in posterior pelvic tail, and tilt your hips back. Now, sit down as low as you can, and extend your hips forward, feeling a deep stretch on the inside of your hip flexors or your adductors. To obtain the most benefits from this movement, back down, drive forward, back down, drive forward, while maintaining a posterior pelvic tilt.
Repeat this movement on the other side. Extend your right leg forward, left leg bent underneath the body, tilt your hips back, rock down, rock forward, and drive those hips forward. Do this one more time. Hips go forward, while your tailbone remains tucked underneath you.
So, if you want to improve your squat, I guarantee if you perform that movement before you lift, you’re definitely going to notice astonishing results and feel much better.
Even if you’re not a squatter, this an awesome exercise to help open up those tight hips!
Now, I’d like to show you a movement that’s especially beneficial for runners. It’s similar to the Back Twist, but we’re eliminating the “twist” because when you run, your hips contract a lot.
The Awesome Runner’s Lunge
If you’re a runner, I encourage you to use the following exercise to quickly loosen up your hips and reduce or eliminate certain pains you might be suffering from. Runners are notorious for having tight hips, but if you perform this Lunge before you run, you’ll be good to go!
Simply bring your quad up, and lift your knee up to the chest. Rock forward as far as you can, and then rock back. Yes, it’s as simple as that. Rock forward, rock back.
Check out the back leg and the right foot. As you rock forward, you’ll notice the foot is not moving. For many runners as they rock forward, their foot turns out. (Example 1 below.) That means they have tightness in either the hamstring or inner thigh.
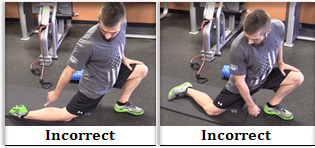
Once you start rotating the joint angles of the body, even if you roll in, it completely changes the dynamic of the stretch. (Example 2 above). Obviously, you want everything to be symmetrical on both sides. When runners don’t warm up properly, they have trouble keeping their legs straight.
Get into the proper position with 90 degrees in the front, somewhat 90 degrees in the back. Rock forward, rock back, rock forward, rock back. Do it one more time. Rock forward, deep as you can go, and then rock back.
The previous exercises effectively warmed up the hips by loosening up the hip flexors, the adductors, and everything that contributes to tightness associated with sitting too much.
Exercises to Increase Strength in the Hip Flexors
Now, you’re ready for exercises that increase strength in your hip flexors, which will aid in increasing speed for all you runners out there. It will also help athletes who need to get off the line quick or require a rapid rate of return on the field.
You’re going to use a typical resistance band around the ankles. You can purchase these at most sporting goods stores. They provide good hip health, hip stability and strength.
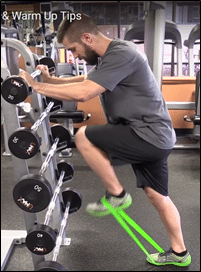
Explosive Knee Drive
Place both feet into the band. Essentially, you’re going to accelerate a movement, by bringing the knee up to the chest. Repeat on the other side. Do this a handful of times after your run, before your run, or on a leg day. It’s a great method for strengthening those hip flexors.
Supine Glute Bridge Single Leg
To begin, find something you can use as a bench; it could be a table, a chair, or a bed.
Place your shoulders on top of the bench and do a glute bridge - nice, flat parallel with the floor. Next, bring the knee up, back down, up and then down again. As you can see in the photo, I’m in a glute bridge yet I’m marching in place, bringing the knee all the way up and activating those hip flexors. The main thing is to keep your hips parallel with the floor to really focus on engaging the glutes.

Next, pull your knee in. If you want to advance this exercise a bit, put the resistance band around your knees, ankles or feet, and do the same thing. You can even attach the band to a pulley on a cable crossbar, but the main thing is to keep your hips up. Because if you drop your hips down, the hips are already flexed. You must be in a neutral or slightly extended hip position to effectively perform this movement.
I’ll demonstrate how it’s done with a resistance band. In this exercise, you’re really going to emphasize hip flexor and hip extensor movements. A standard resistance band is attached to your foot in a way that it doesn’t fly off. If you need to, double up.
Lay back and allow the non-used leg to remain by your side on the floor. Pull the knee in and back out. Notice that the leg is able to go into a hyperextended position. Pull in, and then repeat on the other side.

This is in my opinion probably one of the best hip flexor strengthening exercises that you can do. It takes a bit more to properly set up, but once you get into position, you can literally feel the hip flexor firing very quick. It might not be the most glamorous exercise in the world, but I promise if you incorporate this powerful movement into your exercise, your hip flexors will become much, much stronger.
The Phenomenal Knee Tuck
This is another great exercise that you’ll love to strengthen the hip flexors. While using a stability ball, begin in a push up position with your knees on top of the ball. You’re going to thoroughly engage both your core and arms. Next, you’re going roll the ball very quickly in and then out, and repeat this movement several times.
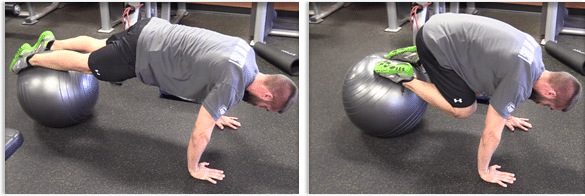
The Knee Tuck is not only great for loosening up your hip flexors, but it’s also incredibly strengthening for your core, shoulders, and even chest. Make it a regular part of your routine!
But don’t forget to warm up and stretch out the hips before performing these exercises to prevent the hip flexors from balling up!
Enter your email and click the button below to get the FREE workout.